Gardens are not just spaces for growing plants but ecosystems that generate beauty and biological waste. Every season, gardeners contend with piles of fallen leaves, cut grass, and pruned branches. Instead of viewing this debris as mere refuse, why not embrace it as a resource? This article explores innovative DIY projects that harness the potential of garden waste, transforming what might be considered trash into treasure.
From creating rich, nutrient-laden mulch for your garden beds to crafting charming natural garden paths, each project offers a way to repurpose organic material effectively. Not only do these initiatives help reduce your environmental footprint by minimizing waste, but they also enhance your garden’s functionality and aesthetic appeal. Join us as we delve into practical and creative uses for your garden waste, turning everyday cleanup into an opportunity for sustainable gardening.
Drown Perennial Weeds
Materials: Large dustbins, water, duckweed.
Start by collecting tough perennial weeds like couch grass, bindweed, and dandelions, known for their thick, white, persistent roots. Fill large dustbins with water and submerge these weeds. The roots, which are rich energy stores, take months to die but eventually break into a compostable mush when submerged.
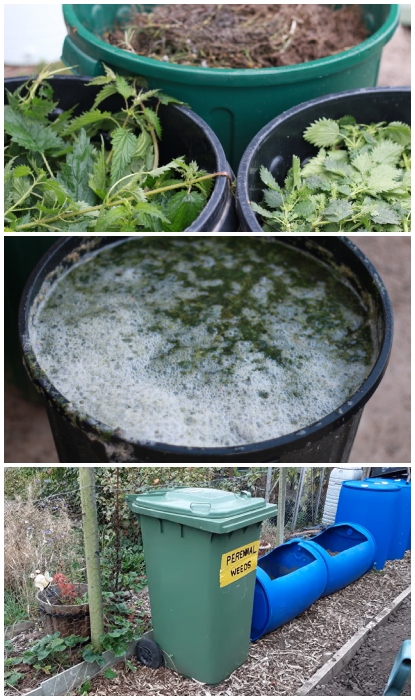
Step 1: Add duckweed to the bins to address the nutrients these weeds have drawn from the soil. This plant thrives in nutrient-rich environments, helps manage odors by consuming excess nutrients, and spreads quickly to cover the surface. Step 2: Once the duckweed has grown sufficiently, skim it off to add to your compost heap or use it directly as mulch. This helps improve soil structure and keeps weeds at bay while recycling nutrients. This method turns a garden nuisance into valuable compost and mulch, enhancing soil health without adding to landfill waste.
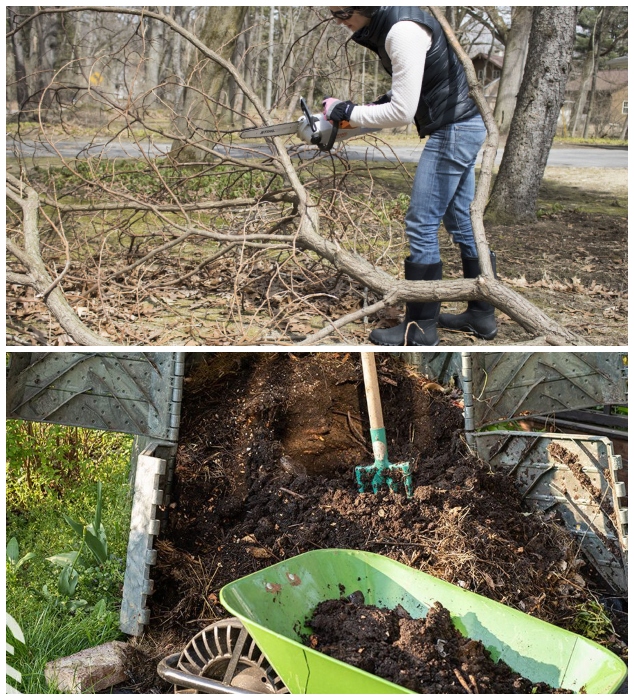
Create a Dead Hedge
Materials: Garden stakes, woody prunings.
Step 1: Place two parallel lines of stakes about 1-2 feet apart in the ground. Step 2: Stack woody prunings from trees, shrubs, and perennials between the stakes.
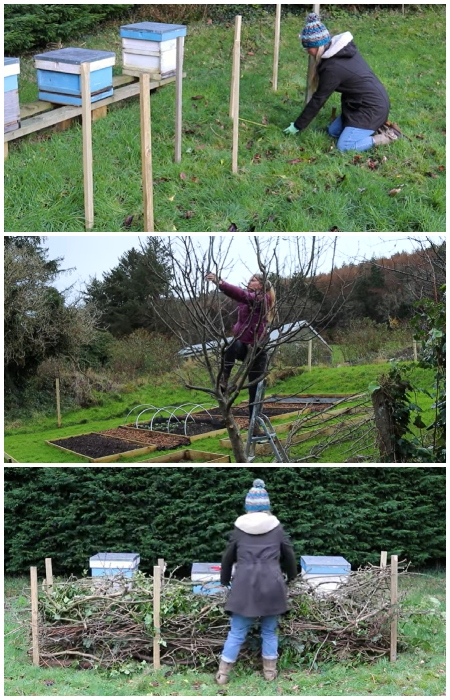
This natural structure serves multiple purposes: it recycles garden waste, provides habitat for wildlife, and adds aesthetic value to your garden. The dead hedge also decomposes gradually, enriching the soil with nutrients over time and creating a sustainable garden that enhances beauty and biodiversity.
Hot Composting
Materials: High-heat compost bin.
Step 1: Gather a mixture of green and brown waste in a compost bin designed to retain heat. Step 2: Manage the compost to ensure it reaches high temperatures, necessary for breaking down tougher materials.
Hot composting is an accelerated composting method that produces nutrient-rich compost more quickly than traditional methods. It effectively kills pathogens and weed seeds, making it a safe option for enriching garden soils and supporting robust plant growth.
Natural Garden Path
Materials: Cut grass, fallen leaves, cardboard, rake, shovel.
Begin by collecting fallen leaves and cut grass from your garden. Step 1: Lay down a layer of cardboard over the designated path area in your garden—this will act as a weed barrier. Step 2: Mix the collected leaves and grass together using a rake. This mixture will be used to create the walking surface.
Step 3: Spread the mixture of leaves and grass evenly over the cardboard, making sure to compact it slightly to form a stable path. Over time, this natural material will decompose, enriching the soil beneath while maintaining a functional and eco-friendly pathway. This project is particularly beneficial as it not only recycles garden waste but also provides a practical use that enhances the accessibility and aesthetic of your garden.
Pine Cone Bird Feeders
Materials: Pine cones, peanut butter, birdseed, string.
Start by gathering pine cones from your garden. Step 1: Secure a string to the top of each pine cone for hanging. This allows you to easily hang the feeders once they are prepared. Step 2: Generously coat each pine cone with peanut butter. The peanut butter is an adhesive that will hold the birdseed in place, plus it’s a tasty treat for the birds. Step 3: Roll the peanut butter-coated pine cones in birdseed until they are well covered. This step ensures that each feeder is packed with seeds, making them attractive to birds.
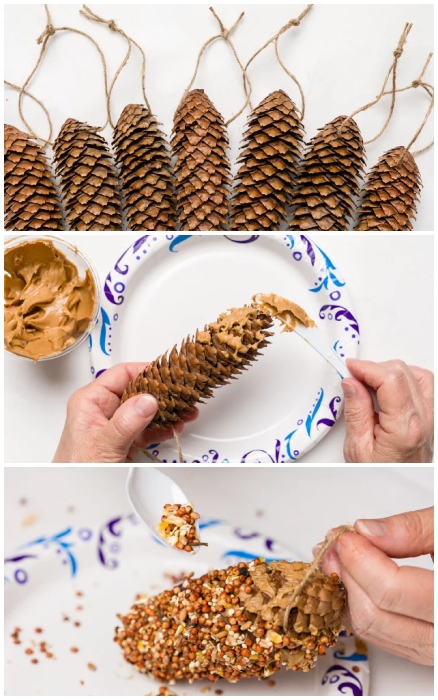
Step 4: Hang the prepared pine cones from branches in your garden. Choose spots that are somewhat sheltered to encourage more birds to visit. These homemade bird feeders utilize natural materials effectively and provide a valuable food source for birds, enhancing the biodiversity of your outdoor space. By inviting birds into your garden, you’re also helping with pest control and enjoying the delightful sight of birds feeding right outside your home.
Bokashi Composting
Materials: Sealed bin, bokashi bran, kitchen waste.
Step 1: Alternate layers of kitchen waste and bokashi bran in a sealed container. Step 2: Let the mixture ferment for about two weeks. Step 3: Mix the pre-composted material into your garden soil or traditional compost bin.
Bokashi composting quickly ferments organic waste, minimizing odors and deterring pests. This method converts kitchen scraps into rich compost that improves soil health and fertility, making it an efficient solution for urban gardeners and those looking to reduce their ecological footprint.
Wormeries
Materials: Wormery, kitchen scraps, worms.
Step 1: Establish a wormery with a suitable container and introduce worms. Step 2: Regularly add kitchen scraps for the worms to consume.
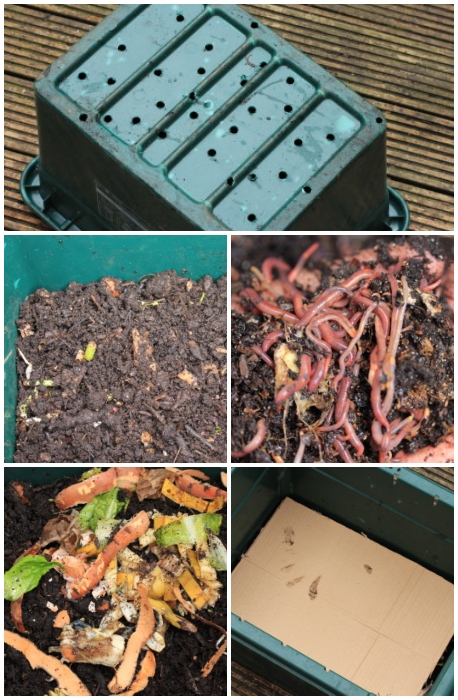
Wormeries provide an excellent way to recycle kitchen waste into high-quality compost. This fine, nutrient-rich compost is particularly beneficial for potted plants and garden beds. Worm composting operates quietly and cleanly, making it an ideal choice for eco-friendly waste management in any setting.
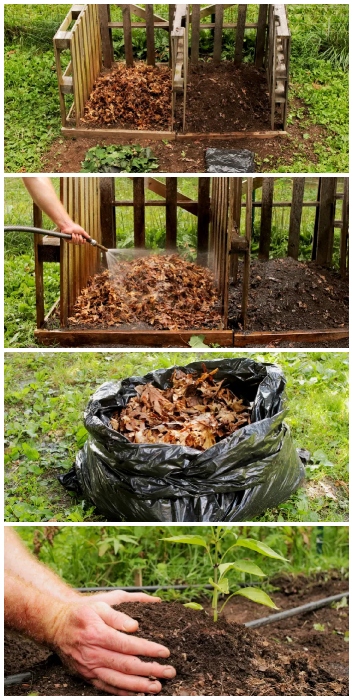
Garden Debris to Mulch
Start by collecting all your garden debris, including leaves, twigs, and grass clippings. Step 1: Using a lawn mower, finely shred these materials to prepare them for mulching. This process efficiently repurposes what might otherwise be waste, turning it into a resource right at home. Step 2: Spread this freshly shredded mulch across your garden beds. The mulch will conserve water by maintaining soil moisture, suppressing unwanted weed growth, and helping stabilize soil temperature, which is crucial for plant health.
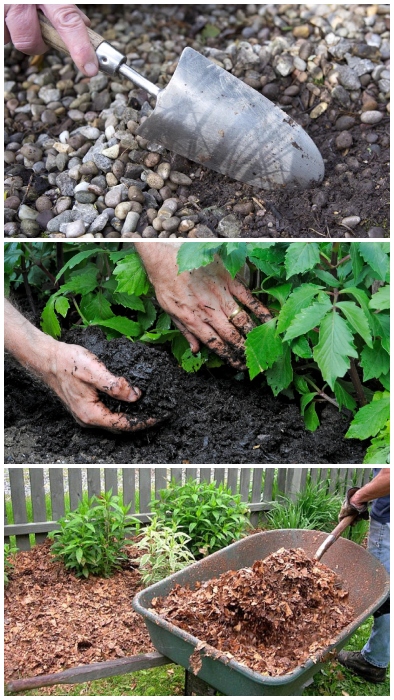
The benefits of using your garden debris for mulch are significant. Not only does this practice reduce waste that would otherwise go directly to the landfill, but it also improves the health and fertility of your soil. This simple, eco-friendly solution leverages materials already at your disposal, enhancing your garden’s sustainability while keeping it lush and thriving. This method makes full use of the natural resources you have, supporting a healthier garden ecosystem with every application.
Build a Birdhouse from Garden Scraps
Materials: Unused wood planks, large bark pieces, old twigs, and dried leaves.
Start by gathering your materials from garden waste, such as unused wood planks, large pieces of bark, twigs, and dried leaves. These items, often discarded, are ideal for creating a sustainable birdhouse. Step 1: Cut the wood to create the frame of the birdhouse. Step 2: Use the bark and twigs to form the outer walls, which will blend naturally with the garden environment. Step 3: Construct the roof with overlapping large bark pieces to ensure it’s waterproof. Step 4: Line the interior with dried leaves to provide insulation and comfort for the birds.
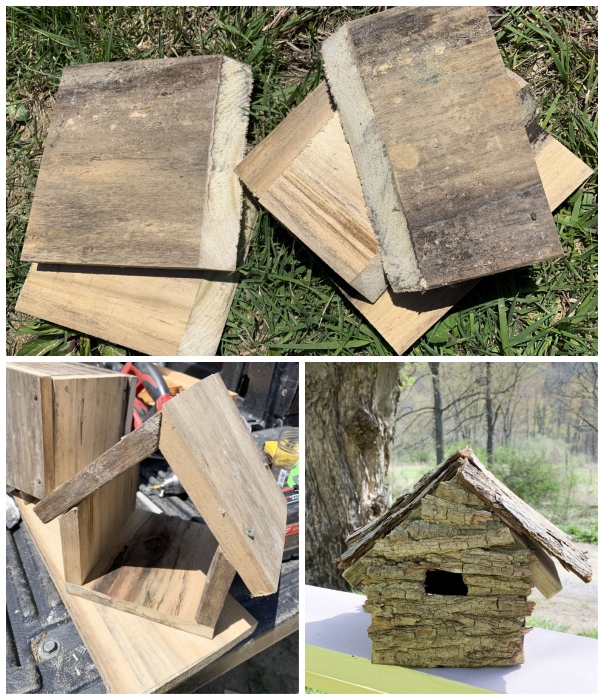
Integrating a birdhouse built from garden waste utilizes materials that would otherwise be thrown away and encourages wildlife to thrive in your garden. Birds contribute to pest control by eating insects and help with plant pollination. Step 5: Install the birdhouse in a sheltered part of your garden to attract birds. This project not only recycles garden waste but also enhances biodiversity, making your garden a sanctuary for both you and local wildlife.
Organic Pest Control
Materials: Eggshells, coffee grounds, orange peels, banana peels.
Begin by collecting eggshells, coffee grounds, and citrus peels—common kitchen waste that can double as effective pest repellents. Step 1: Crush the eggshells into small pieces to deter snails and slugs and sprinkle them around your plants. Step 2: Distribute wet coffee grounds near your vegetable patches to keep away larger mammals and other pests. Step 3: Chop orange and banana peels and scatter them to repel aphids, ants, and mosquitoes.
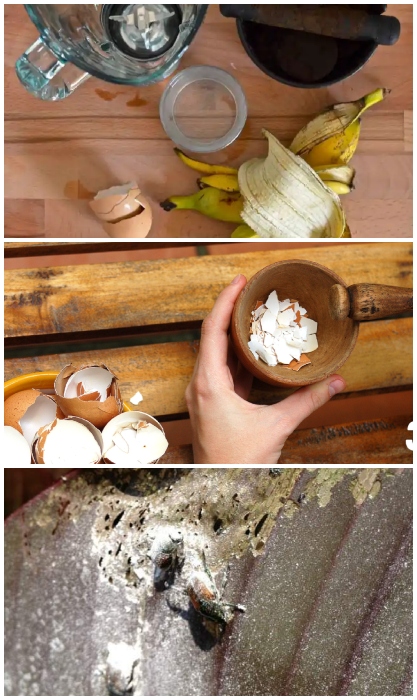
This method effectively uses waste products and eliminates the need for chemical pesticides. It makes your garden safer for pollinators like bees and enhances the overall health of your garden’s ecosystem. Plus, these natural repellents add nutrients back into the soil, benefiting your plants.
Rainwater Collection System
Materials: Old pots, trays, downspouts.
Step 1: Position old pots and trays strategically under downspouts or areas where rainwater naturally accumulates. Step 2: Collect and store the rainwater during rainfall. Step 3: Use the collected water for your gardening needs, reducing reliance on tap water.
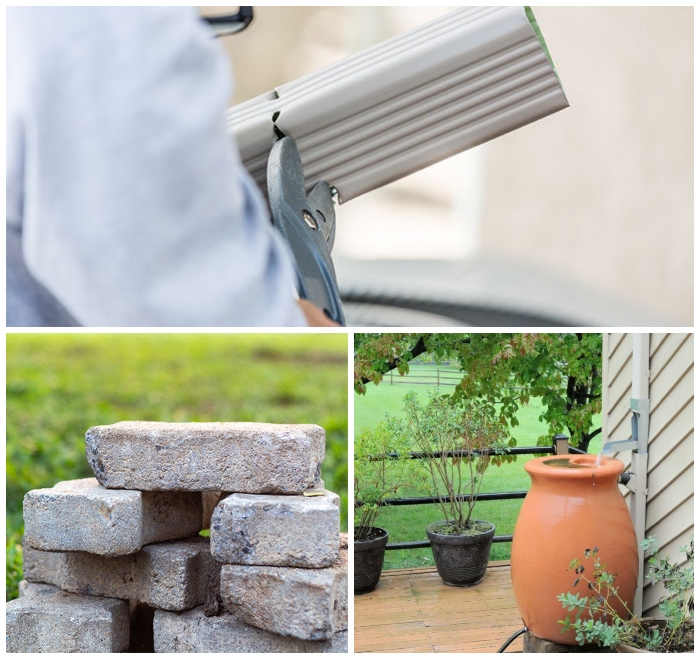
This simple system conserves water and repurposes old garden containers, contributing to a more sustainable garden practice. By using rainwater, you are utilizing a natural resource that is better for your plants due to its lack of chlorine and other chemicals in tap water.
Supports for Climbers
Materials: Long twigs, branches.
Step 1: Gather long twigs and branches from your garden clearout. Step 2: Arrange them around your climbing plants for natural support. Step 3: Secure the twigs and branches in the ground or against existing structures to ensure stability.
Using natural materials for plant supports saves money and reduces waste and environmental impact. This approach is perfect for gardeners looking to maintain an organic and aesthetic garden environment.
Natural Barriers Against Pests
Materials: Holly cuttings, conifer branches.
Step 1: Collect prickly plant cuttings such as holly and conifers. Step 2: Spread these cuttings over bare patches of soil and around the perimeter of your garden beds.
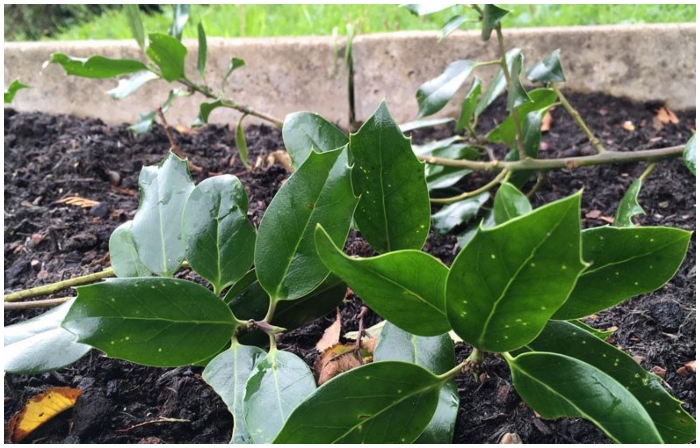
This natural barrier effectively deters larger animals from invading garden spaces. Utilizing your garden’s resources for pest control keeps your garden chemical-free and safe for all its inhabitants while repurposing waste that would otherwise be discarded.
Grass Cycling on Lawns
Materials: Mulching lawn mower.
Leave grass clippings on your lawn after mowing, a process known as grasscycling. Step 1: Mow your lawn regularly using a mulching lawn mower that chops up the clippings finely. Step 2: Allow the chopped clippings to remain on the lawn, where they decompose naturally. This practice returns essential nutrients to the soil, retains moisture to keep the grass healthy, and reduces the need for synthetic fertilizers.
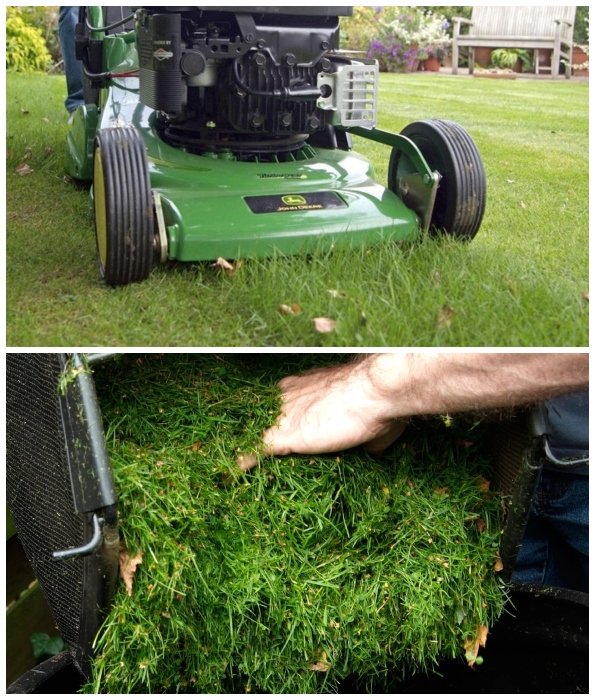
By grasscycling, you save time and energy and significantly reduce carbon emissions associated with transporting yard waste. This method is an easy step towards a more sustainable lawn care routine.
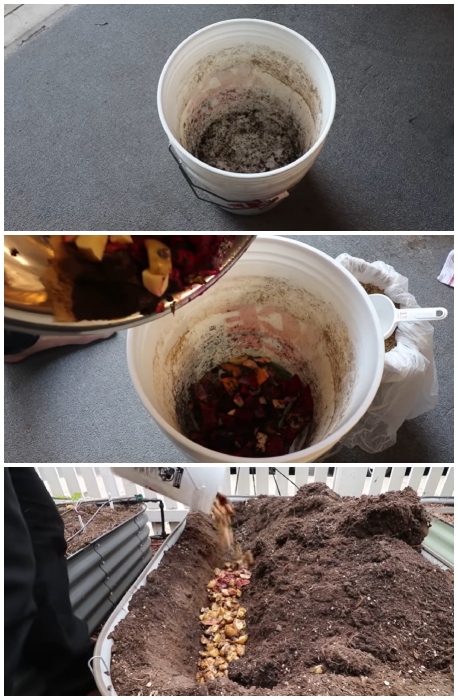
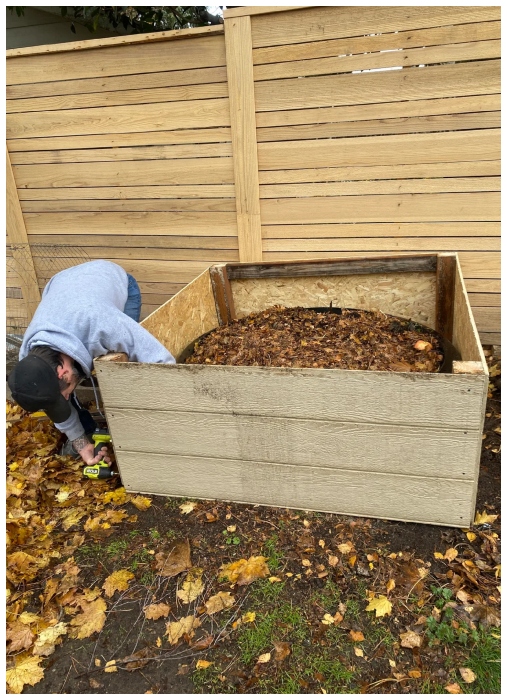
Filling Raised Garden Beds
Materials: Branches, leaves, garden waste.
Branch, leaf, and other garden waste can be used to fill raised beds, which is particularly effective for cultivating squash, pumpkins, and melons. Step 1: Layer the bottom of the raised beds with bulky garden waste. Step 2: Top off the beds with soil and compost.
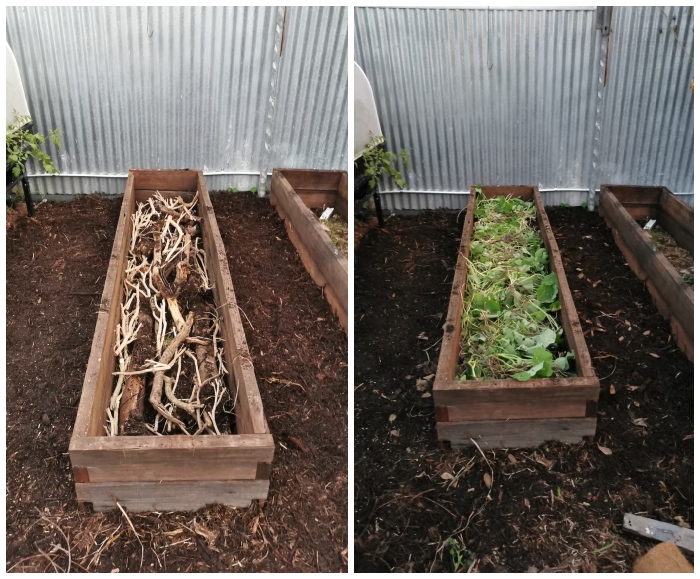
This technique allows the organic materials to slowly decompose, releasing nutrients back into the soil while also reducing the amount of purchased soil and compost needed. It’s an economical and environmentally friendly way to enhance the fertility of your garden beds.
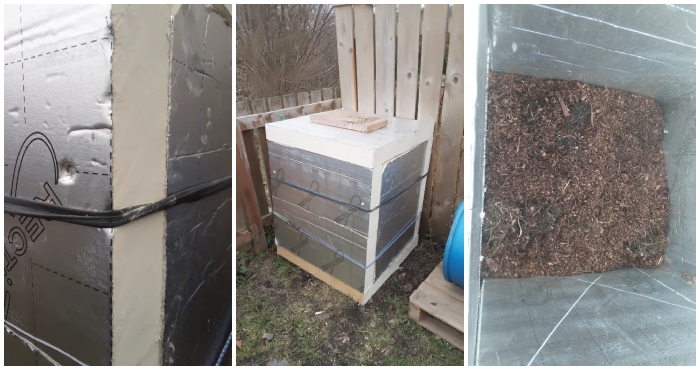
Pallet Compost Bin
Materials: 4 heat-treated wooden pallets, decking screws or strong cable ties, L-brackets (optional), wooden stakes (optional), gate hinges and screws, gate latch or bungee cord, chicken wire (optional), wood paint or stain (optional), insulating material.
Step 1: Secure a location on bare soil in a sunny part of your yard and level the ground. Step 2: Assemble the bin by standing three pallets in a U-shape and securing them at the corners using cable ties or screws. You can use L-brackets or drive stakes into the ground for added stability.

Step 3: Optionally, attach a fourth pallet with hinges to serve as a gate, allowing easy access to turn the compost. Step 4: Line the interior with chicken wire if desired, and consider insulating the walls with cardboard or straw to maintain heat. Building a pallet compost bin is a sustainable way to manage garden waste and produce rich compost, all while keeping the setup tidy and efficient.
Secure Compost Area
Materials: Chicken wire or wire fencing, stakes.
Step 1: Choose a suitable outdoor area for your compost pile. Step 2: Surround the area with chicken wire or similar fencing secured with stakes. This enclosure helps keep the compost contained and accelerates the decomposition process by maintaining adequate heat and moisture levels.
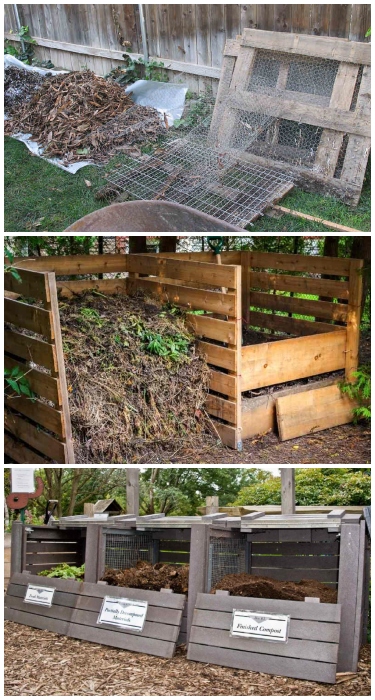
This simple and secure setup is ideal for starting a basic compost pile. It ensures that it remains tidy and functional without the need for advanced construction or materials.
DIY Compost Tumbler
Materials: 50- or 55-gallon drum, sawhorse brackets, two-by-fours, slotted angle metal, galvanized steel pipe, steel caps, bolts and nuts, pipe hanger straps, continuous steel hinge, chest latch.
Step 1: Construct a stand using sawhorse brackets and two-by-fours. Step 2: Prepare a 50- or 55-gallon drum by marking and cutting a door on its side. Step 3: Attach the drum to the stand using the steel pipe through pre-drilled holes, securing with caps.
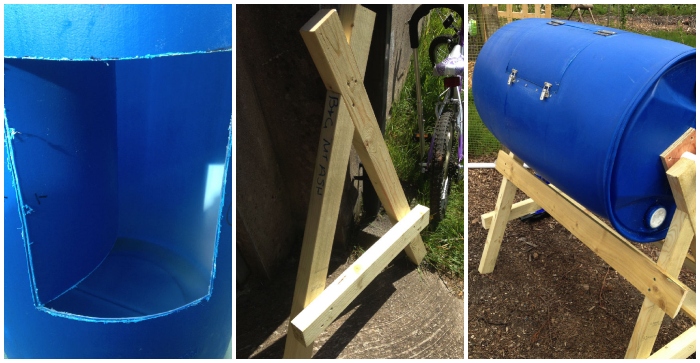
Step 4: Install mixing paddles inside the drum using bolts to ensure materials turn effectively. Step 5: Attach the door with hinges and secure it with a latch or bungee cord for easy access. This DIY compost tumbler simplifies turning compost, making the process cleaner and more efficient. It is ideal for frequent composting without physical strain.
Dig-and-Drop Composting
Materials: Shovel, compost materials.
Step 1: Dig a hole in an area of your garden where you want to enrich the soil. Step 2: Fill the hole with your compostable materials, such as kitchen scraps and yard waste. Step 3: Cover the hole with the excavated soil.
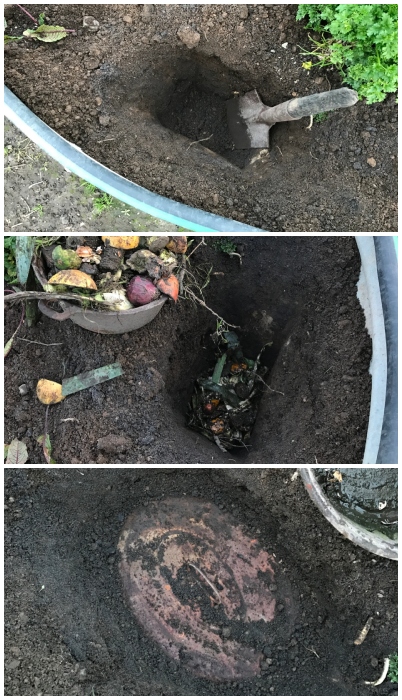
The dig-and-drop method is a straightforward technique for directly enriching the soil around plants. It’s an efficient way to use compost by letting it decompose in situ, providing nutrients directly to the soil without the need for a traditional compost bin.
Wildlife Habitats
Materials: Fallen branches, leaves, garden waste.
Create a wildlife sanctuary right in your backyard by using garden waste. Step 1: Choose a quiet corner of your garden where wildlife can thrive without disturbance. Step 2: Pile up fallen branches, leaves, and other garden waste to form a natural habitat. This makeshift habitat uses yard debris and provides crucial shelter and nesting sites for beneficial insects, birds, and small mammals.
This simple project enhances the ecological balance of your garden by encouraging biodiversity and promoting a healthier, more vibrant yard ecosystem where both plants and animals can flourish.
Rustic Garden Path
Materials: Wood chips, bark, small branches.
Step 1: Collect wood chips, bark, and small branches from your garden waste. Step 2: Lay out a pathway in your garden using the collected materials, pressing them firmly into the soil to create a stable walking surface.
This rustic garden path not only adds charm and character to your garden but also uses up wood waste efficiently. It provides a natural, permeable surface that improves soil drainage and reduces mud.
Natural Wind Chimes
Materials: Twigs, strong twine, small branches, a drill.
Step 1: Select a few sturdy twigs and small branches. Step 2: Drill small holes at both ends of each piece. Step 3: String them together with twine, varying the lengths to create pleasant sounds.
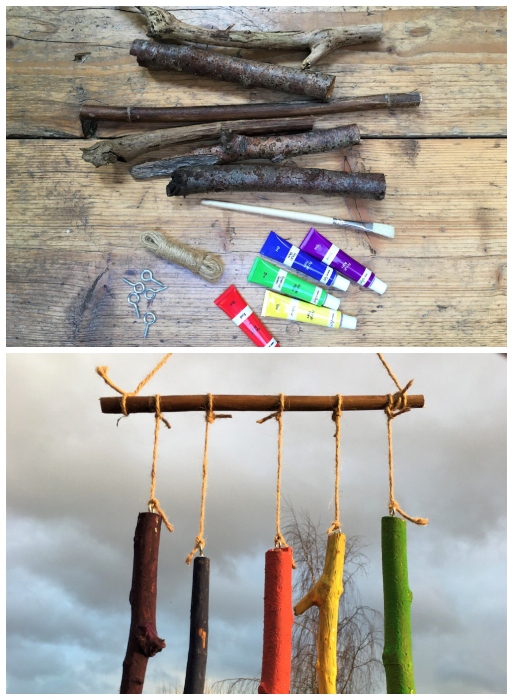
Hang these natural wind chimes in your garden to add a whimsical, musical element that moves with the breeze. This project not only recycles garden waste but also enhances the sensory appeal of your outdoor space.
Decorative Twig Frames
Materials: Twigs, hot glue gun, string or wire.
Step 1: Cut twigs to desired frame sizes. Step 2: Use a hot glue gun to assemble the twigs into rectangular or square shapes. Step 3: Secure the corners with string or wire for added stability.
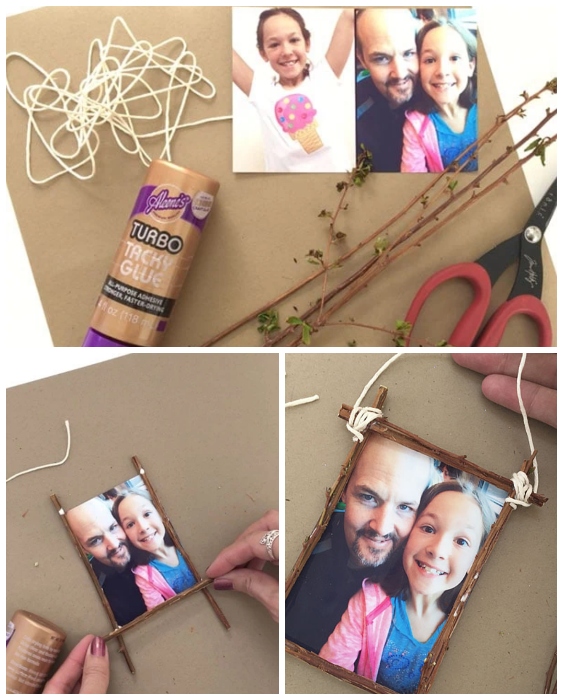
Use these twig frames to showcase garden photos, climbing plants, or as standalone decorative elements around your garden. They add a rustic touch to any garden setting and make use of smaller twigs that are often overlooked.
Plant Markers
Materials: Flat stones, twigs, waterproof paint, or a paint marker.
Step 1: Collect flat stones and sturdy, straight twigs from your garden. Step 2: Paint the names of plants directly on the stones or carve them into the twigs using a waterproof paint marker.
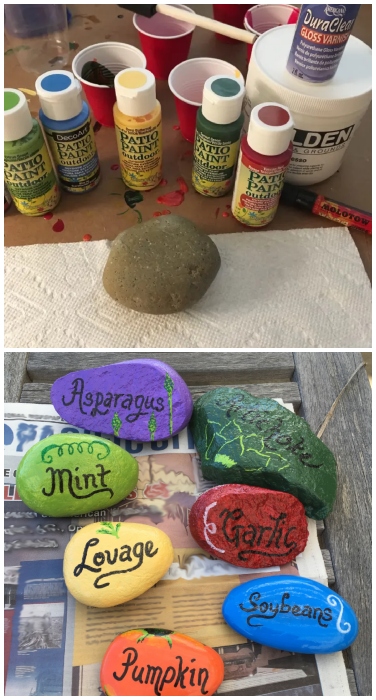
Place these natural plant markers next to their respective plants in your garden. They serve a practical purpose by helping you identify plants while adding a charming, rustic look to your garden beds.
Compost Bin Accents
Materials: Unused wooden planks, decorative stones, paint.
Step 1: Collect unused wooden planks and decorative stones from around your garden. Step 2: Use these materials to enhance the exterior of your compost bins, creating patterns or mosaics. Step 3: Optionally, paint the wood for additional flair.
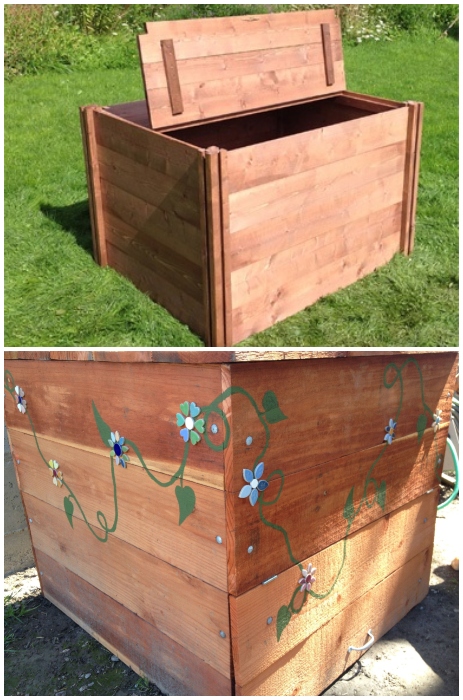
This project beautifies your compost bins and repurposes materials that might otherwise be discarded. It turns functional elements into focal points in your garden, blending utility with aesthetics.
Leaf Mold Insulation
Materials: Fallen leaves, large bin, or wire frame.
Step 1: Collect fallen leaves during autumn. Step 2: Place the leaves into a large bin or construct a simple wire frame to contain them. Step 3: Allow the leaves to decompose over a year; they will turn into leaf mold.
Leaf mold is an excellent natural insulator for your garden. Wrap it around delicate plants in the winter to protect them from frost. This method recycles leaves efficiently, turning them into a valuable garden resource that enhances soil structure and fertility when used as mulch in spring.
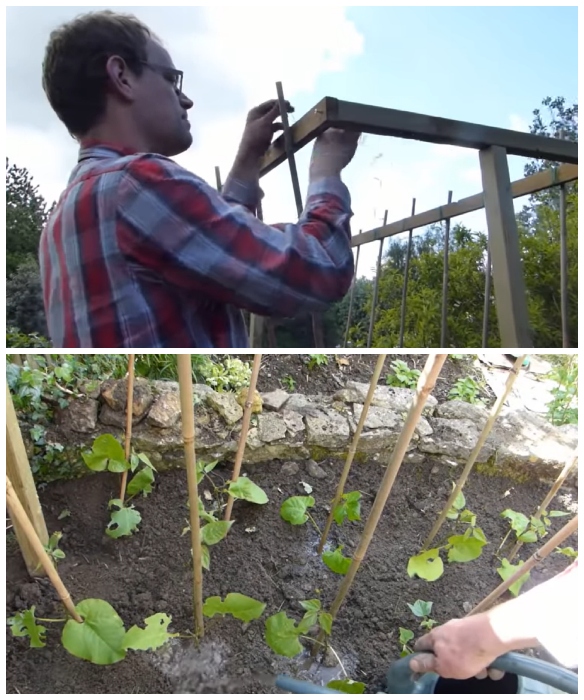
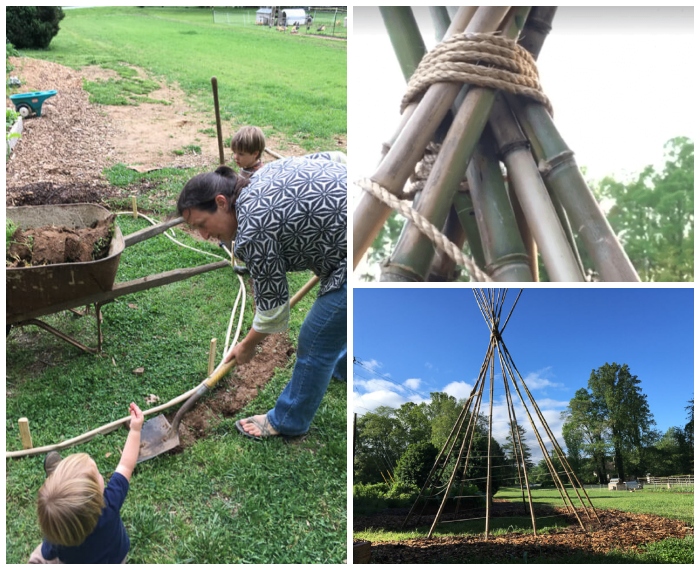
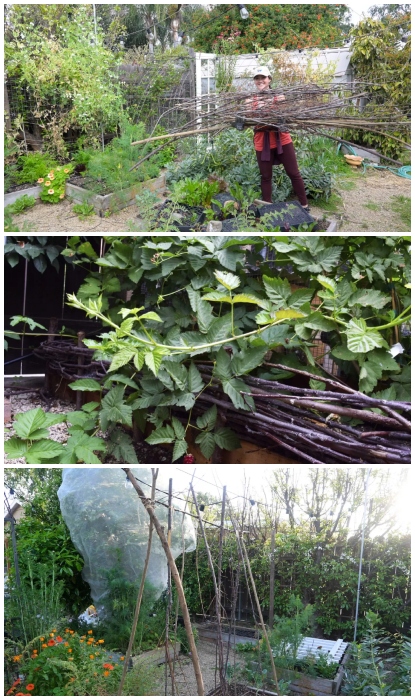
Garden Trellis
Materials: Bamboo stakes, twine, pruning shears.
Step 1: Collect bamboo stakes or long, straight branches from your garden pruning. Step 2: Cut the branches to uniform lengths and tie them together at the top to form a teepee shape or a flat panel, depending on your space and need. Step 3: Secure the structure in your garden.
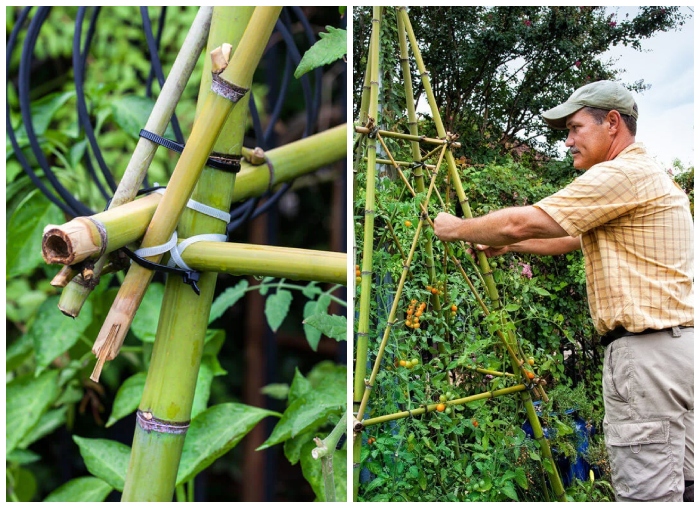
This garden trellis supports climbing plants such as peas, beans, and flowering vines. It’s a functional addition to your garden that utilizes pruned branches, helping to keep your garden tidy and your climbers supported.
Herbal Fire Starters
Materials: Dried herb branches (like rosemary, thyme), twine.
Step 1: Gather dried branches of aromatic herbs from your garden. Step 2: Bundle them tightly with twine. Step 3: Allow them to dry completely if not already dried.
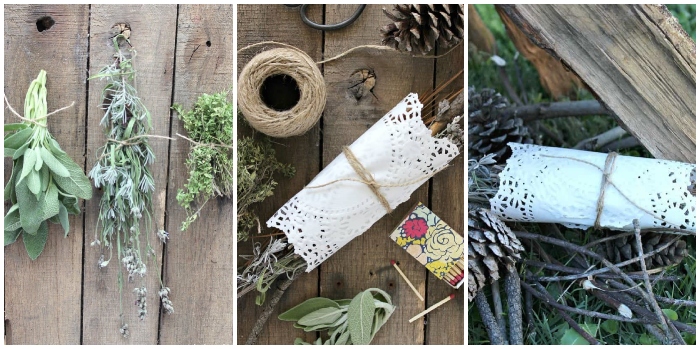
Use these herbal fire starters to ignite your fireplace or campfire. They burn slowly and release pleasant scents, enhancing the ambiance of your fire with a touch of nature. This project recycles garden trimmings and adds a unique, aromatic experience to your fire-lighting occasions.
Branch Coasters
Materials: Thick branches, saw, sandpaper, varnish.
Step 1: Cut slices from a thick branch to create raw coasters. Step 2: Sand the surfaces smooth. Step 3: Apply varnish to protect the wood and reveal its natural patterns.
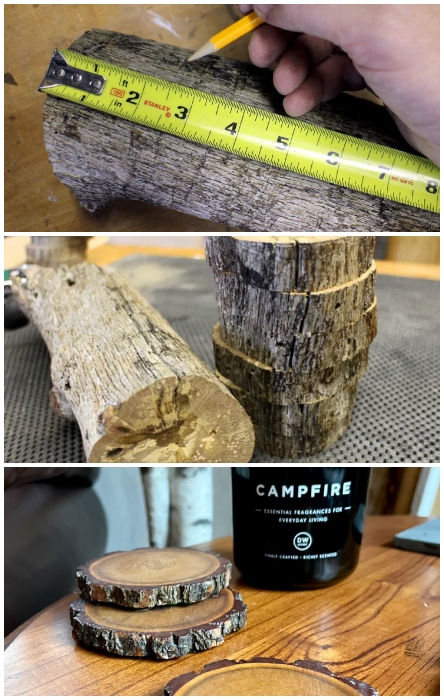
These rustic coasters are perfect for adding a natural aesthetic to your home decor. They protect your surfaces while showcasing the beauty of your garden’s wood, making them functional and stylish accessories for any setting.
Compost Aerator Wand
Materials: Long, sturdy branch, saw, sandpaper.
Step 1: Select a long, sturdy branch from garden debris. Step 2: Cut it to about 4 feet in length. Step 3: Sand any rough edges to make handling safer.
Use this simple tool to aerate your compost pile effectively. Regularly stirring your compost with this wand helps speed up the decomposition process by introducing oxygen, which is crucial for composting. This DIY aerator is a practical tool that repurposes garden waste and assists in creating rich compost for your garden.
Stone Garden Path
Materials: Stones, sand, rake.
Step 1: Gather various sized stones from your garden or leftovers from other projects. Step 2: Lay a sand base on your intended path. Step 3: Place the stones into the sand, pressing them firmly.
Create a beautiful, durable path through your garden using stones that might otherwise go unused. This path adds structure to your garden and provides a stable walking surface, reducing soil compaction around plant beds.
Natural Garden Edging
Materials: Branches, a mallet, garden shears.
Step 1: Collect straight branches and trim them to uniform lengths. Step 2: Hammer them into the ground side by side along the borders of your garden beds using a mallet. Step 3: Ensure they are deeply embedded for stability.
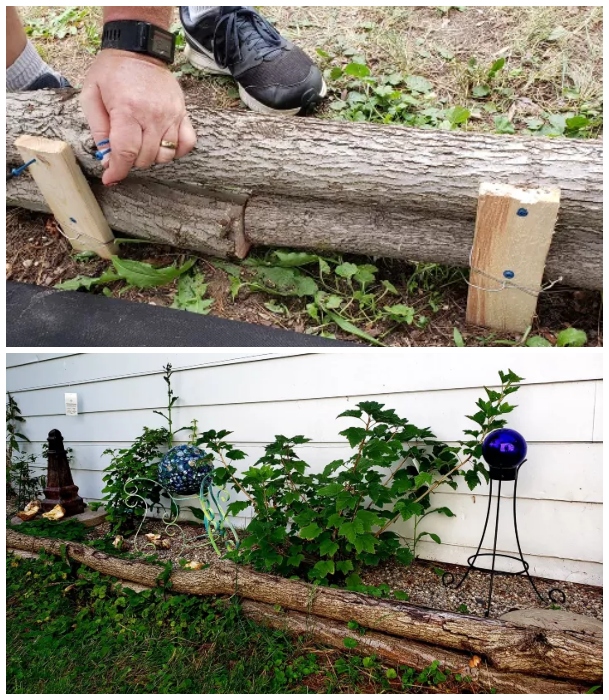
This natural garden edging defines the spaces in your garden, keeping soil and mulch tidy while adding a rustic charm. It’s an excellent way to recycle pruned branches and enhance the visual appeal of your garden layout.
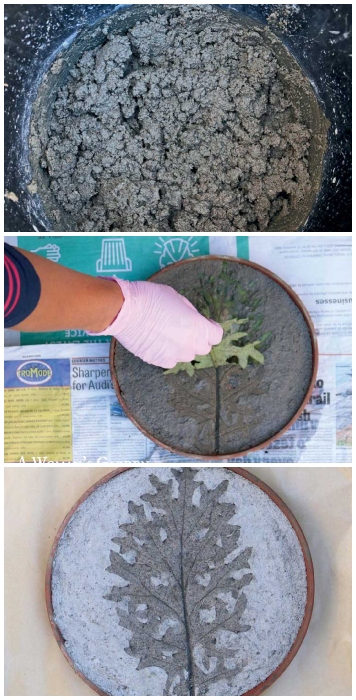
Bird Bath
Materials: Large flat leaf, sand, concrete mix, water, bucket.
Step 1: Use a large, sturdy leaf, like a rhubarb leaf, as a mold. Step 2: Mix concrete in a bucket and spread it over the leaf, which should be placed on a pile of sand for support. Step 3: Allow it to cure, then remove the leaf.
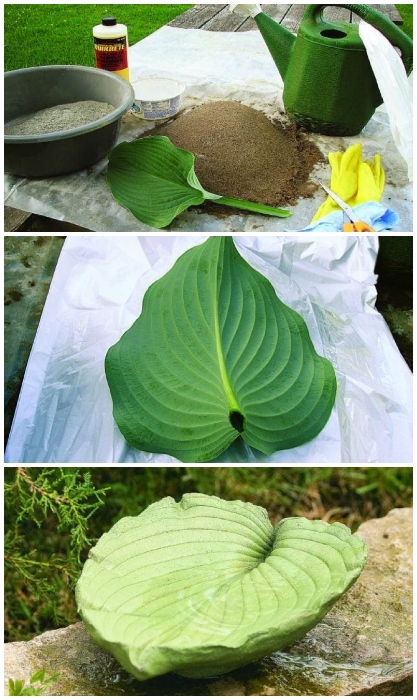
Create a unique bird bath that adds a functional and artistic element to your garden. This project recycles natural materials and provides a refreshing spot for birds, enriching biodiversity in your garden.
Seedling Pots
Materials: Newspaper, scissors, cylindrical mold (like a can).
Step 1: Cut strips of newspaper and wrap them around a cylindrical mold. Step 2: Fold the bottom edges inward to create a base. Step 3: Slip the mold out and fill the pot with soil.
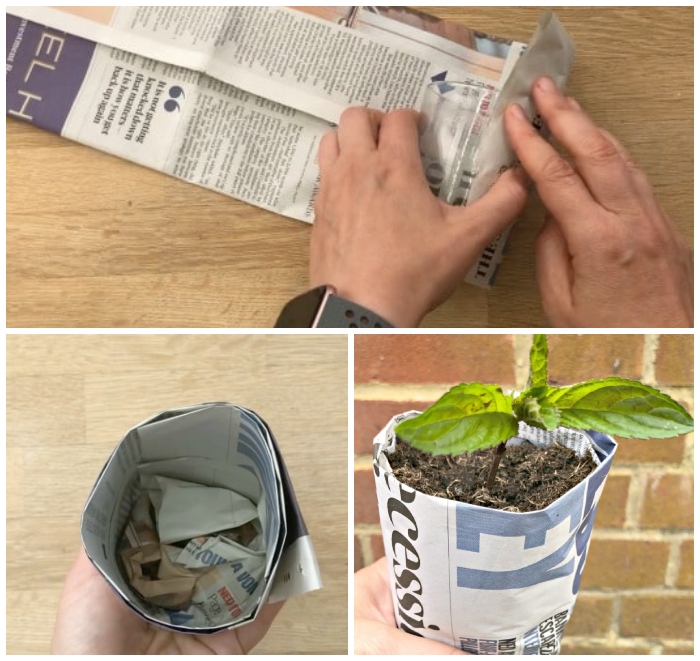
These biodegradable seedling pots are perfect for starting garden plants. They are economical, reduce waste, and can be planted directly into the soil, minimizing root disturbance.
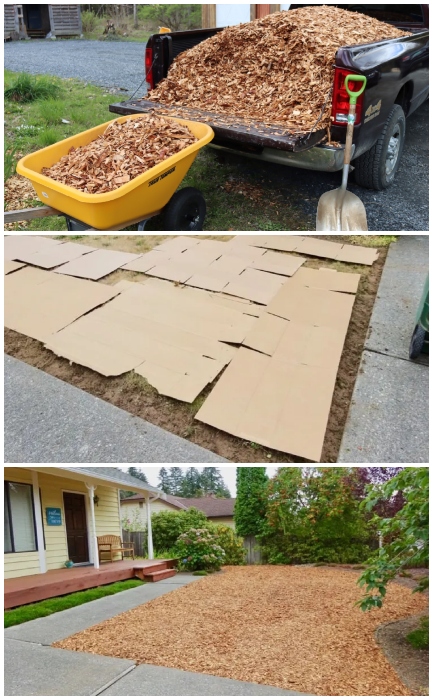
Wood Chip Mulch
Materials: Wood chips, garden rake.
Step 1: Collect wood chips from pruned or fallen branches using a chipper. Step 2: Spread the chips around your plants and along pathways using a garden rake.
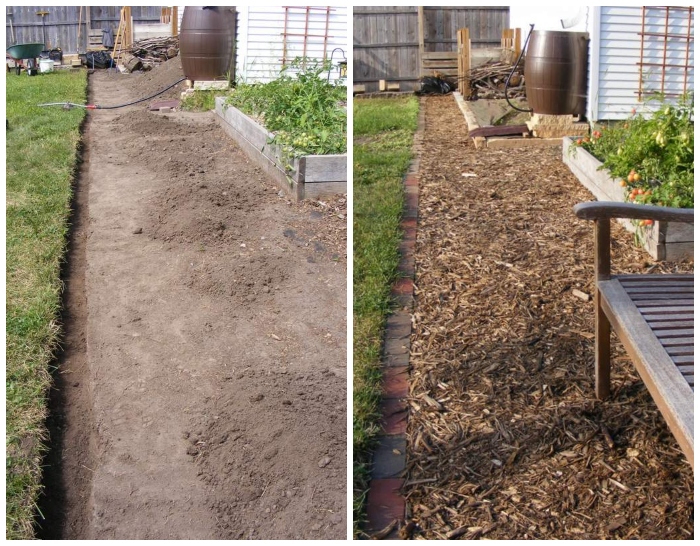
Wood chip mulch is excellent for conserving moisture, suppressing weeds, and adding a neat, uniform look to your garden. This project recycles wood waste and enhances soil health as the chips gradually break down.
Garden Swing
Materials: Sturdy branches, strong rope, seat board.
Step 1: Find two sturdy branches for the swing’s support and one for the seat. Step 2: Secure the seat board with a rope tied to the support branches. Step 3: Ensure everything is safely secured and stable before use.

This charming garden swing made from recycled branches provides a fun and relaxing spot in your garden. It’s a creative way to repurpose larger branches, adding both functionality and a playful element to your outdoor space.
Leaf Imprint Stepping Stones
Materials: Concrete mix, water, bucket, large leaves, mold frame.
Step 1: Mix concrete in a bucket and pour it into a mold frame. Step 2: Press large leaves into the wet concrete to create imprints. Step 3: Let the concrete set before removing the leaves and moving the stepping stones to your desired location.
These stepping stones add a decorative touch to pathways or garden sections. The leaf imprints create a natural artwork, making each step visually appealing and integrating seamlessly into the garden environment.
Decorative Garden Spheres
Materials: Old metal wire, twine, glue, assorted garden debris like moss, small twigs.
Collect some old metal wire and start shaping it into spheres. Step 1: Wrap the spheres securely with twine, using glue to ensure they hold together well. Step 2: Decorate these spheres by attaching moss, small twigs, or even small stones to add texture and visual interest. Use glue to affix these materials to the twine-wrapped wire.
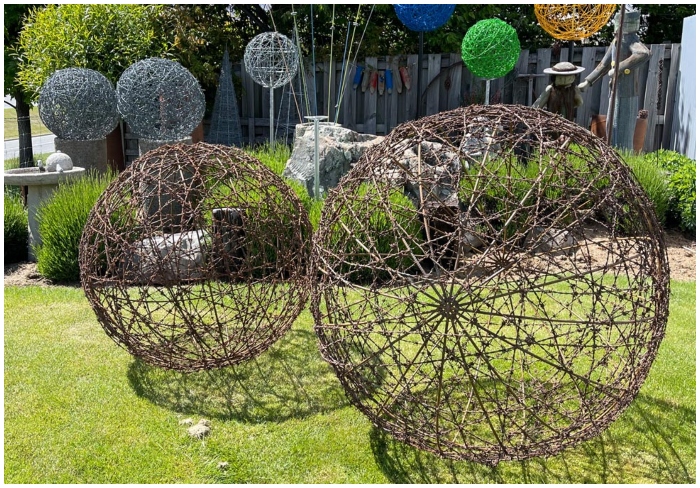
Step 3: Place these decorative spheres around your garden or hang them from trees. The natural materials blend seamlessly with the outdoor environment, adding a rustic and whimsical touch to your garden’s aesthetic. This project recycles various small garden waste materials, transforming them into artistic elements that enhance the garden’s natural beauty.
Branch Bean Teepees
Materials: Long branches, garden twine, soil.
Gather long, straight branches from around your garden. Step 1: Tie the branches at the top to form a teepee shape using sturdy garden twine. Step 2: Firmly anchor the base of each branch in your garden soil to ensure the structure is stable. This creates a robust framework for climbing plants.
Step 3: Plant climbing beans or other vine plants at the base of each teepee. As the plants grow, they will climb up the branches, covering the structure and creating a natural, living garden feature. This supports the growth of climbing plants and adds a vertical element of interest and utility to your garden layout.
Organic Garden Stakes
Materials: Straight twigs or branches, knife.
Start by collecting straight twigs or thin branches from your garden. Step 1: Use a knife to sharpen one end of each twig or branch, creating a pointed stake. Step 2: Use these stakes to support plants in your garden, particularly those that tend to flop over or need guidance as they grow. They can also be used as natural markers for rows in your vegetable garden.
These organic garden stakes are an eco-friendly alternative to plastic or metal stakes, blending in aesthetically with the garden and providing essential support to your plants. Using natural materials promotes a sustainable gardening practice while maintaining an orderly garden appearance.
Natural Leaf Thatch Roof for Birdhouses
Materials: Fallen leaves, twine, birdhouse.
Collect a significant quantity of fallen leaves from your garden. Step 1: Bind these leaves together with twine to create sturdy panels. Step 2: Attach these leaf panels to the roof of a birdhouse to provide additional insulation and camouflage. This enhances the aesthetic appeal of the birdhouse and makes it a more inviting refuge for birds.
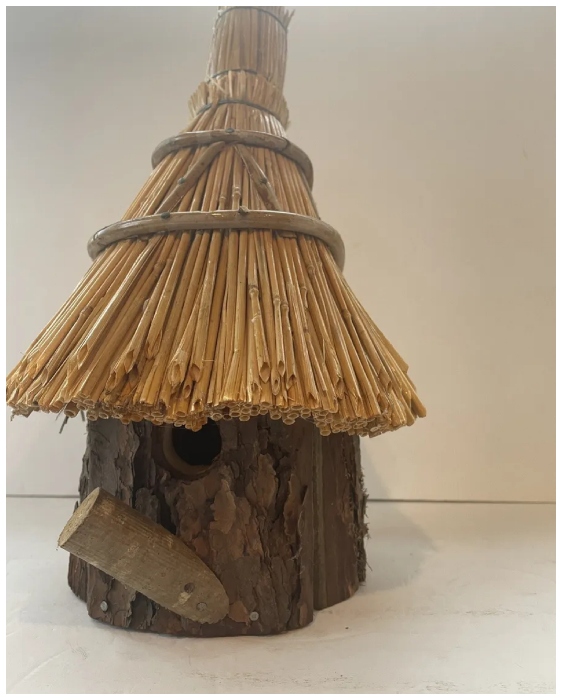
Step 3: Position the birdhouse in a sheltered part of your garden to encourage birds to use it. This project improves wildlife habitats and utilizes abundant garden waste, contributing to biodiversity in your garden by providing shelter for various bird species.
Woven Wattle Fencing
Materials: Flexible willow branches or other suitable twigs stakes.
Install stakes at regular intervals along the desired line for your fence. Step 1: Weave flexible branches, such as willow, horizontally between the stakes, layering them to build up the fence to the desired height. Step 2: Ensure that each layer is securely interwoven to provide strength and stability to the fence.
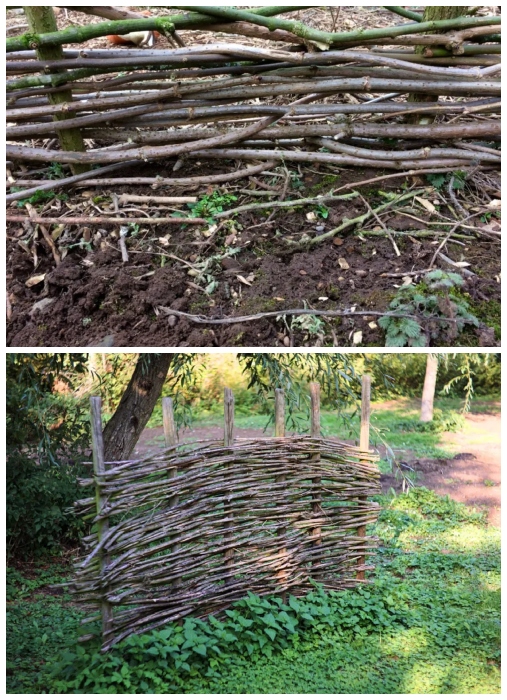
This wattle fencing is a functional and decorative barrier in your garden, delineating sections or providing a backdrop for flower beds. It is a traditional method that not only recycles garden prunings but also adds a charming, rustic look to your garden landscape, enhancing its functionality and aesthetic appeal.
Compost Heap Enclosure
Materials: Old pallets, nails, hammer.
Start by collecting several old pallets, which are often available for free from local businesses. Step 1: Use a hammer and nails to connect the pallets together, forming three sides of a square. Step 2: Secure the structure by nailing each joint thoroughly to ensure stability. This simple enclosure keeps your compost heap neatly contained and accelerates the composting process by maintaining a more consistent internal temperature
Step 3: Place this enclosure in a discreet area of your garden, ideally on bare soil. It will help you manage garden waste efficiently, turning it into rich soil for your garden while keeping the area tidy.
Twig Obelisks
Materials: Long twigs or branches, garden twine, secateurs.
Gather long twigs or branches from your garden pruning. Step 1: Trim the branches to a uniform length using secateurs. Step 2: Arrange the branches in a circular pattern and tie them at the top to form an obelisk shape using garden twine. Ensure the base is wide enough to stand stable.
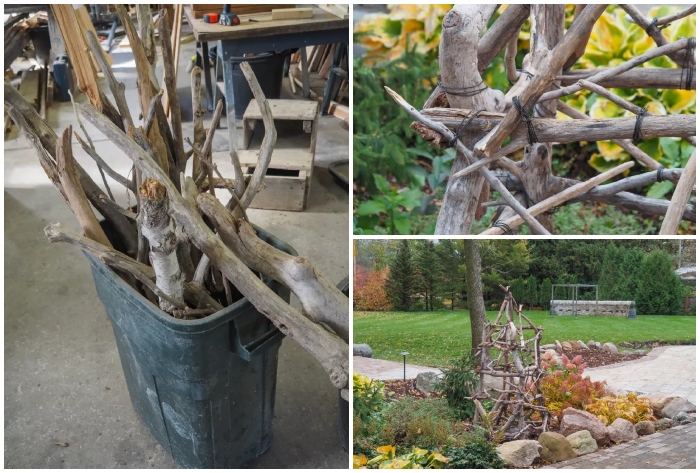
Step 3: Place these twig obelisks in your flower beds or vegetable garden. They can be used to support climbing plants like sweet peas or cucumbers, adding both functionality and a natural aesthetic appeal to your garden.
Rustic Wood Benches
Materials: Thick logs, saw sandpaper.
If you have thicker branches or logs from a tree removal, Step 1 is to cut them into equal lengths using a saw to serve as the seat and legs of a bench. step 2 is to sand the cut pieces to smooth out rough edges and prevent splinters.
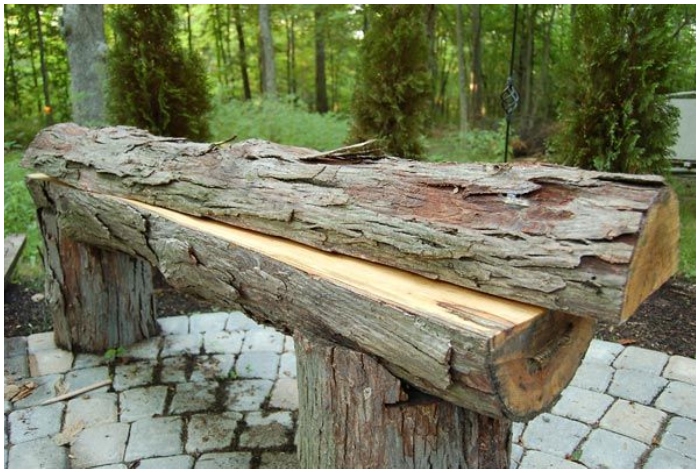
Step 3: Assemble the logs to form a simple bench, securing the seat logs side by side on top of two wider log pieces used as the base. This rustic wood bench provides a charming seating option in your garden, allowing you to enjoy your outdoor space while repurposing larger wood waste.
Garden Tool Handles
Materials: Sturdy branches, knife, sandpaper.
Select sturdy, straight branches from your garden waste. Step 1: Use a knife to whittle one end into a smooth handle shape. Step 2: Sand the handle for a comfortable grip.
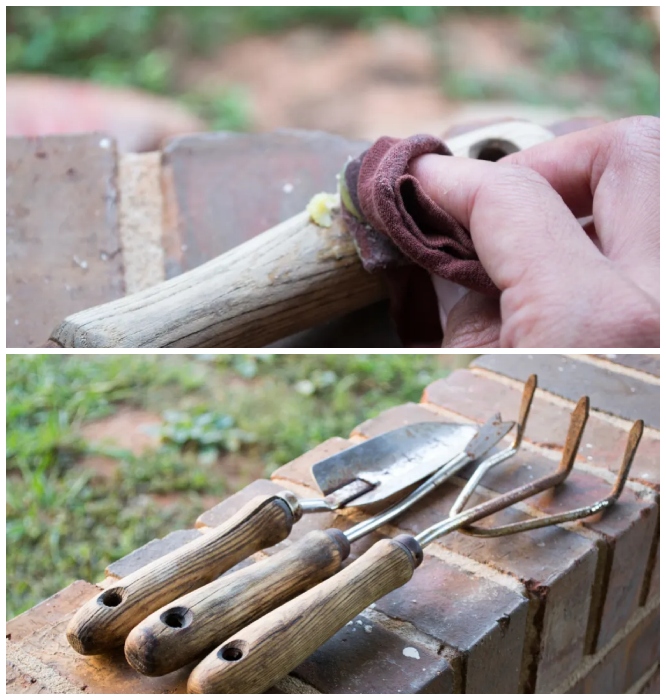
Step 3: Replace broken or worn handles on garden tools like rakes or shovels with your handcrafted handles. This not only recycles materials but also extends the life of your garden tools, blending functionality with sustainability.